写入CP210x EEPROM并结合udev rules绑定串口号(Ubuntu)
References:
这是什么?
利用CP2102(USB-UART转换芯片)具有内置可重复编程存储器(EEPROM)的特点,使用工具为芯片写入自定义的信息,这样就能让系统在检测到特定设备时,将其绑定到特定的路径上。
例如我使用一个USB Hub和若干CP2102转换出了三个串口,分别连接激光雷达/IMU/单片机,这时在系统中有三个串口:/dev/ttyUSB0、/dev/ttyUSB1、/dev/ttyUSB2。尽管在大多数情况下,只要CP2102与USB HUB的连接顺序不变,串口号的顺序也就是不变的,但这样仍不太可靠,尤其是在重新插拔HUB后,串口号常常会从0/1/2变成1/2/3,给开发调试带来麻烦。
通过修改EEPROM中的数据+udev规则,能够完美解决需要固定串口号的需求。
环境准备
USB转串口芯片:Silicon Labs CP2102
根据cp210x编程工具开发者的说明:
CP2102/CP2103/CP2101,内置1KB EEPROM,均支持重复编程写入(但对CP2101的支持不确定)。
CP2104/CP2105/CP2109,内置EPROM,无法编程。
CP2102N能够重复编程,但工具暂不支持该型号。
操作系统:Ubuntu 22.04 x64
安装CP210x编程工具
首先将仓库克隆到本地:
cd ~
git clone https://github.com/VCTLabs/cp210x-program
然后安装一下:
cd cp210x-program
sudo pip install -e .
sudo chmod +x ./cp210x-program
测试工具能否正常运行:
sudo ./cp210x-program如果你看到这样的输出,没有python相关的报错,就说明可以正常使用了:
USB find_device returned:
DEVICE ID 10c4:ea60 on Bus 003 Address 059 =================
 bLength                :   0x12 (18 bytes)
 bDescriptorType        :    0x1 Device
 bcdUSB                 :  0x110 USB 1.1
 bDeviceClass           :    0x0 Specified at interface
 bDeviceSubClass        :    0x0
 bDeviceProtocol        :    0x0
 bMaxPacketSize0        :   0x40 (64 bytes)
 idVendor               : 0x10c4
 idProduct              : 0xea60
 bcdDevice              :  0x100 Device 1.0
 iManufacturer          :    0x1 Silicon Labs
 iProduct               :    0x2 CP2102 USB to UART Bridge Controller
 iSerialNumber          :    0x3 0001
 bNumConfigurations     :    0x1
  CONFIGURATION 1: 100 mA ==================================
   bLength              :    0x9 (9 bytes)
   bDescriptorType      :    0x2 Configuration
   wTotalLength         :   0x20 (32 bytes)
   bNumInterfaces       :    0x1
   bConfigurationValue  :    0x1
   iConfiguration       :    0x0
   bmAttributes         :   0x80 Bus Powered
   bMaxPower            :   0x32 (100 mA)
    INTERFACE 0: Vendor Specific ===========================
     bLength            :    0x9 (9 bytes)
     bDescriptorType    :    0x4 Interface
     bInterfaceNumber   :    0x0
     bAlternateSetting  :    0x0
     bNumEndpoints      :    0x2
     bInterfaceClass    :   0xff Vendor Specific
     bInterfaceSubClass :    0x0
     bInterfaceProtocol :    0x0
     iInterface         :    0x2 CP2102 USB to UART Bridge Controller
      ENDPOINT 0x81: Bulk IN ===============================
       bLength          :    0x7 (7 bytes)
       bDescriptorType  :    0x5 Endpoint
       bEndpointAddress :   0x81 IN
       bmAttributes     :    0x2 Bulk
       wMaxPacketSize   :   0x40 (64 bytes)
       bInterval        :    0x0
      ENDPOINT 0x1: Bulk OUT ===============================
       bLength          :    0x7 (7 bytes)
       bDescriptorType  :    0x5 Endpoint
       bEndpointAddress :    0x1 OUT
       bmAttributes     :    0x2 Bulk
       wMaxPacketSize   :   0x40 (64 bytes)
       bInterval        :    0x0
Cp210xProgrammer returned obj:
<cp210x.cp210x.Cp210xProgrammer object at 0x7eeffb5a0400>
Cp210xProgrammer instance is valid!!
usb ctrl msg: request, value, index, length:
  255 14089 0 1024
EEPROM returned obj:
<cp210x.eeprom.EEPROM object at 0x7eeffb47c5e0>
[usb device]
product_string = CP2102 USB to UART Bridge Controller
serial_number = 0001
vendor_id = 10C4
product_id = EA60
version = 1.00
bus_powered = no
max_power = 100
locked = no
part_number = 2
vendor_string = Silicon Labs

[baudrate table]
1500000 = FFF0, FFFA, 1 # 1500000 Baud, 12 us
1500000 = FFF0, FFFA, 1 # 1500000 Baud, 12 us
1200000 = FFEC, FFF8, 1 # 1200000 Baud, 16 us
 921600 = FFE6, FFF6, 1 #  923077 Baud, 20 us
 576000 = FFD6, FFF0, 1 #  571429 Baud, 32 us
 500000 = FFD0, FFEE, 1 #  500000 Baud, 36 us
 460800 = FFCC, FFEC, 1 #  461538 Baud, 40 us
 256000 = FFA2, FFDC, 1 #  255319 Baud, 72 us
 250000 = FFA0, FFDC, 1 #  250000 Baud, 72 us
 230400 = FF98, FFD9, 1 #  230769 Baud, 78 us
 153600 = FF64, FFC5, 1 #  153846 Baud, 118 us
 128000 = FF44, FFB9, 1 #  127660 Baud, 142 us
 115200 = FF30, FFB2, 1 #  115385 Baud, 156 us
  76800 = FEC8, FF8B, 1 #   76923 Baud, 234 us
  64000 = FE89, FF73, 1 #   64000 Baud, 282 us
  57600 = FE5F, FF63, 1 #   57554 Baud, 314 us
  56000 = FE53, FF5F, 1 #   55944 Baud, 322 us
  51200 = FE2B, FF50, 1 #   51173 Baud, 352 us
  38400 = FD8F, FF15, 1 #   38400 Baud, 470 us
  28800 = FCBF, FEC7, 1 #   28812 Baud, 626 us
  19200 = FB1E, FE2B, 1 #   19200 Baud, 938 us
  16000 = FA24, FE0C, 1 #   16000 Baud, 1.000 ms
  14400 = F97D, FE0C, 1 #   14397 Baud, 1.000 ms
   9600 = F63C, FE0C, 1 #    9600 Baud, 1.000 ms
   7200 = F2FB, FE0C, 1 #    7201 Baud, 1.000 ms
   4800 = EC78, FE0C, 1 #    4800 Baud, 1.000 ms
   4000 = E890, FE0C, 1 #    4000 Baud, 1.000 ms
   2400 = D8F0, FE0C, 1 #    2400 Baud, 1.000 ms
   1800 = CBEB, FE0C, 1 #    1800 Baud, 1.000 ms
   1200 = B1E0, FE0C, 1 #    1200 Baud, 1.000 ms
    600 = 63C0, FE0C, 1 #     600 Baud, 1.000 ms
    300 = B1E0, FE0C, 4 #     300 Baud, 1.000 ms
确认设备所在的Bus/Device路径
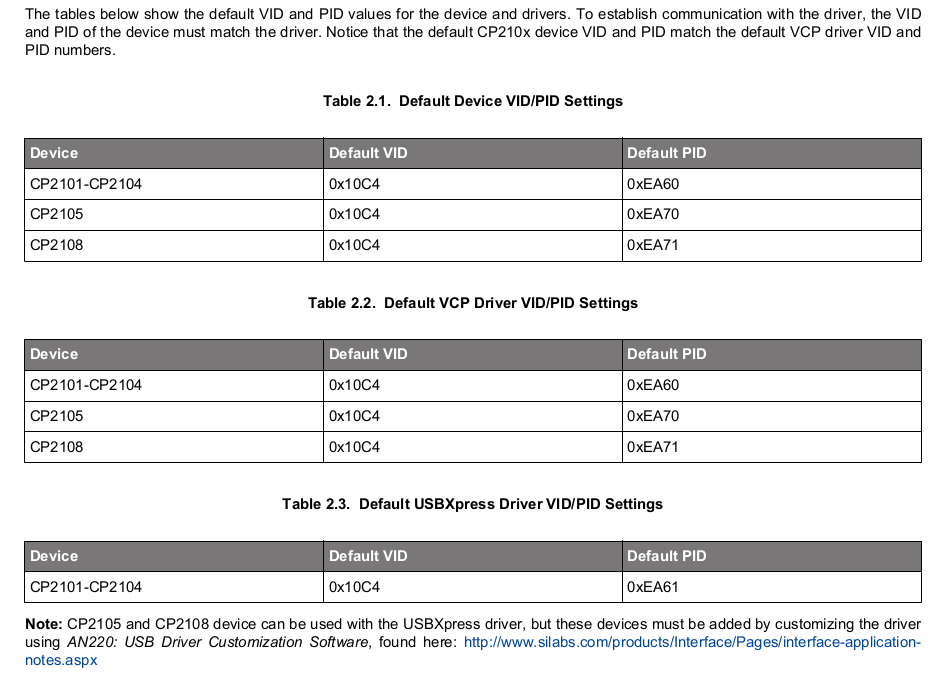
sudo lsusb -v -d 10c4:ea60 | grep -E "iProduct|CP210x"注:EA60是CP2101-2104的ProductID,如果你使用的是其他型号,参考这张表修改命令:

执行命令后,你应该能看到这样的输出:
$ sudo lsusb -v -d 10c4:ea60 | grep -E "iProduct|CP210x"
Bus 003 Device 059: ID 10c4:ea60 Silicon Labs CP210x UART Bridge
  idProduct          0xea60 CP210x UART Bridge
  iProduct                2 CP2102 USB to UART Bridge Controller
Bus 003 Device 057: ID 10c4:ea60 Silicon Labs CP210x UART Bridge
  idProduct          0xea60 CP210x UART Bridge
  iProduct                2 CP2102 USB to UART Bridge Controller
Bus 003 Device 056: ID 10c4:ea60 Silicon Labs CP210x UART Bridge
  idProduct          0xea60 CP210x UART Bridge
  iProduct                2 CP2102 USB to UART Bridge Controller
Bus 003 Device 054: ID 10c4:ea60 Silicon Labs CP210x UART Bridge
  idProduct          0xea60 CP210x UART Bridge
  iProduct                2 CP2102 USB to UART Bridge Controller
Bus 003 Device 053: ID 10c4:ea60 Silicon Labs CP210x UART Bridge
  idProduct          0xea60 CP210x UART Bridge
  iProduct                2 CP2102 USB to UART Bridge Controller
Bus 003 Device 052: ID 10c4:ea60 Silicon Labs CP210x UART Bridge
  idProduct          0xea60 CP210x UART Bridge
  iProduct                2 CP2102 USB to UART Bridge Controller
Bus 003 Device 051: ID 10c4:ea60 Silicon Labs CP210x UART Bridge
  idProduct          0xea60 CP210x UART Bridge
iProduct 2 CP2102 USB to UART Bridge Controller这里的iProduct就是我们一会儿要修改的Product String
如果你需要修改个CP210x芯片的信息,那么最简单的方法就是一次插入一个、修改一个,再换下一个。
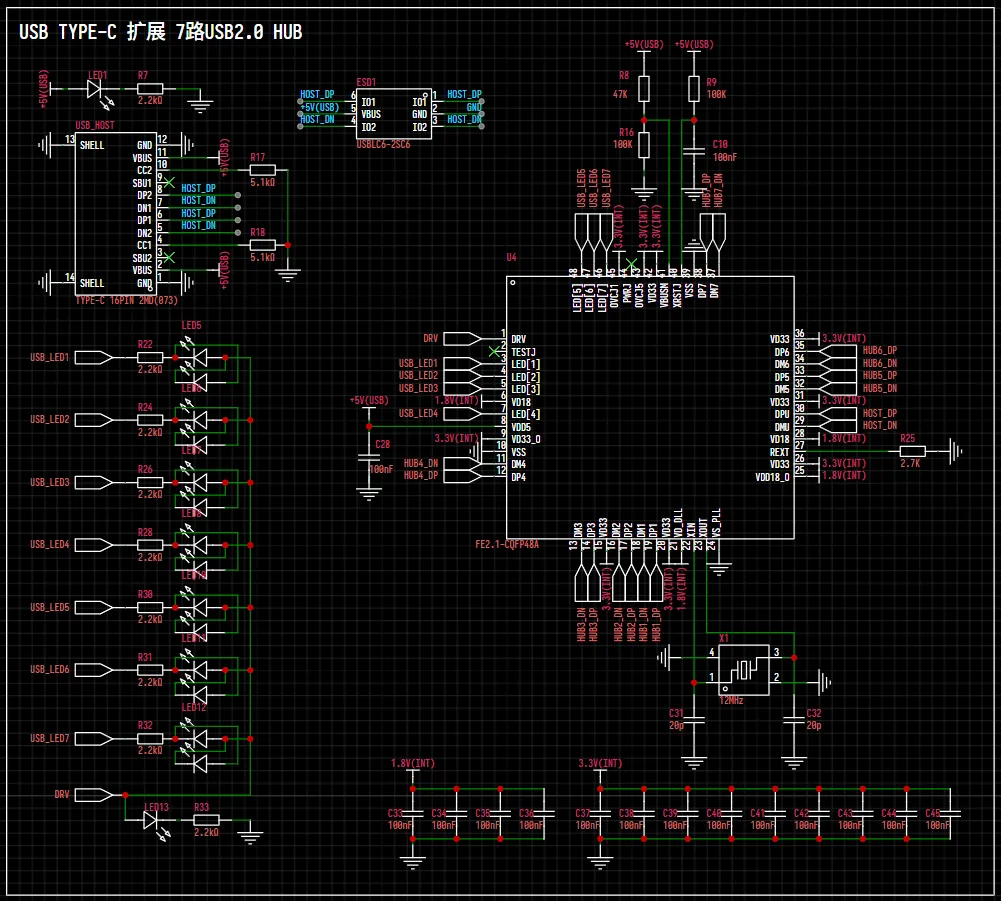
如果你像我一样直接把USB HUB和一堆CP2102画在了PCB板上,没办法一次只插入一个,也没关系,Device后面的数字与HUB的通道编号是对应的,例如我这里使用的是FE2.1(1转7)USB HUB芯片,具有7个下游通道,那么电路上的HUB1/2/3就对应这里的Device 051/052/053,以此类推。

以我的板子为例,HUB1/2/3分别连接了激光雷达/IMU/步进电机,确定了对应的Bus/Device号为003/051、003/052、003/053,接下来就可以进行编程了。
修改CP210x EEPROM信息
确保当前目录位于cp210x-program下。
以位于003/051的激光雷达为例,使用以下命令修改ProductString:
sudo ./cp210x-program \
-m 003/051 \
--write-cp210x \
--set-product-string="RPLIDAR A1"
显示以下信息就代表成功:
usb ctrl msg: request, value, index, length:
255 14090 0 1重新拔插一下(或使用usbreset热重置),就能看到变化了:
$ sudo lsusb -v -d 10c4:ea60 | grep -E "iProduct|CP210x"
Bus 003 Device 069: ID 10c4:ea60 Silicon Labs CP210x UART Bridge
  idProduct          0xea60 CP210x UART Bridge
  iProduct                2 CP2102 USB to UART Bridge Controller
Bus 003 Device 067: ID 10c4:ea60 Silicon Labs CP210x UART Bridge
  idProduct          0xea60 CP210x UART Bridge
  iProduct                2 CP2102 USB to UART Bridge Controller
Bus 003 Device 066: ID 10c4:ea60 Silicon Labs CP210x UART Bridge
  idProduct          0xea60 CP210x UART Bridge
  iProduct                2 CP2102 USB to UART Bridge Controller
Bus 003 Device 064: ID 10c4:ea60 Silicon Labs CP210x UART Bridge
  idProduct          0xea60 CP210x UART Bridge
  iProduct                2 CP2102 USB to UART Bridge Controller
Bus 003 Device 063: ID 10c4:ea60 Silicon Labs CP210x UART Bridge
  idProduct          0xea60 CP210x UART Bridge
  iProduct                2 CP2102 USB to UART Bridge Controller
Bus 003 Device 062: ID 10c4:ea60 Silicon Labs CP210x UART Bridge
  idProduct          0xea60 CP210x UART Bridge
  iProduct                2 CP2102 USB to UART Bridge Controller
Bus 003 Device 061: ID 10c4:ea60 Silicon Labs CP210x UART Bridge
  idProduct          0xea60 CP210x UART Bridge
  iProduct                2 RPLIDAR A1
可以看到,位于003/061(刚刚是003/051,由于重新插拔设备号变大了)的设备的ProductString已经成功被修改为“RPLIDAR A1”,终于能和其他同样的CP210x区分开来了。
同样地,使用此工具你还能修改VendorID(VID)、ProductID(PID)、VendorName、ProductName、序列号等,但通常不建议修改ProductName以外的参数,只需要修改ProductName以达到区分多个同款芯片的目的就可以了。修改VID/PID可能会出现问题。
接下来,重复刚才的步骤,修改其他几个芯片的信息(修改后别忘了插拔一下或使用usbreset)
最终结果如下:
$ sudo lsusb -v -d 10c4:ea60 | grep -E "iProduct|CP210x"
Bus 003 Device 091: ID 10c4:ea60 Silicon Labs CP210x UART Bridge
  idProduct          0xea60 CP210x UART Bridge
  iProduct                2 Servo Arm
Bus 003 Device 089: ID 10c4:ea60 Silicon Labs CP210x UART Bridge
  idProduct          0xea60 CP210x UART Bridge
  iProduct                2 Espressif ESP32-S3 N16R8
Bus 003 Device 088: ID 10c4:ea60 Silicon Labs CP210x UART Bridge
  idProduct          0xea60 CP210x UART Bridge
  iProduct                2 Stepper H
Bus 003 Device 086: ID 10c4:ea60 Silicon Labs CP210x UART Bridge
  idProduct          0xea60 CP210x UART Bridge
  iProduct                2 Stepper Z
Bus 003 Device 085: ID 10c4:ea60 Silicon Labs CP210x UART Bridge
  idProduct          0xea60 CP210x UART Bridge
  iProduct                2 Stepper XY
Bus 003 Device 084: ID 10c4:ea60 Silicon Labs CP210x UART Bridge
  idProduct          0xea60 CP210x UART Bridge
  iProduct                2 Witmotion IMU
Bus 003 Device 083: ID 10c4:ea60 Silicon Labs CP210x UART Bridge
  idProduct          0xea60 CP210x UART Bridge
  iProduct                2 RPLIDAR A1
创建udev规则
现在每个串口芯片都有自己独特的ProductName了,接下来就要创建一个udev rule来帮助系统识别它们,并绑定到特定的路径上。
sudo nano /etc/udev/rules.d/99-specific-serial.rules我这里的规则如下:
KERNEL=="ttyUSB*", MODE:="0666", ATTRS{idVendor}=="10c4", ATTRS{idProduct}=="ea60", ATTRS{product}=="RPLIDAR A1", SYMLINK+="ttyUSB_lidar"
KERNEL=="ttyUSB*", MODE:="0666", ATTRS{idVendor}=="10c4", ATTRS{idProduct}=="ea60", ATTRS{product}=="Witmotion IMU", SYMLINK+="ttyUSB_imu"
KERNEL=="ttyUSB*", MODE:="0666", ATTRS{idVendor}=="10c4", ATTRS{idProduct}=="ea60", ATTRS{product}=="Stepper XY", SYMLINK+="ttyUSB_stp_xy"
KERNEL=="ttyUSB*", MODE:="0666", ATTRS{idVendor}=="10c4", ATTRS{idProduct}=="ea60", ATTRS{product}=="Stepper Z", SYMLINK+="ttyUSB_stp_z"
KERNEL=="ttyUSB*", MODE:="0666", ATTRS{idVendor}=="10c4", ATTRS{idProduct}=="ea60", ATTRS{product}=="Stepper H", SYMLINK+="ttyUSB_stp_h"
KERNEL=="ttyUSB*", MODE:="0666", ATTRS{idVendor}=="10c4", ATTRS{idProduct}=="ea60", ATTRS{product}=="Espressif ESP32-S3 N16R8", SYMLINK+="ttyUSB_mcu"
KERNEL=="ttyUSB*", MODE:="0666", ATTRS{idVendor}=="10c4", ATTRS{idProduct}=="ea60", ATTRS{product}=="Servo Arm", SYMLINK+="ttyUSB_servo_arm"这里统一添加了
ttyUSB前缀,可以在使用ls命令时更清晰地看到效果,实际使用中可以改成你期望的任何名字,但仍然建议有一个统一的前缀以便调试。
让规则生效:
sudo udevadm control --reload-rules
sudo udevadm trigger
接下来,就可以看到效果了:
$ ls -l /dev/ttyUSB*
crw-rw-rw- 1 root dialout 188, 0  4月  4 16:22 /dev/ttyUSB0
crw-rw-rw- 1 root dialout 188, 1  4月  4 16:22 /dev/ttyUSB1
crw-rw-rw- 1 root dialout 188, 2  4月  4 16:22 /dev/ttyUSB2
crw-rw-rw- 1 root dialout 188, 3  4月  4 16:22 /dev/ttyUSB3
crw-rw-rw- 1 root dialout 188, 4  4月  4 16:22 /dev/ttyUSB4
crw-rw-rw- 1 root dialout 188, 5  4月  4 16:22 /dev/ttyUSB5
crw-rw-rw- 1 root dialout 188, 6  4月  4 16:22 /dev/ttyUSB6
lrwxrwxrwx 1 root root         7  4月  4 16:22 /dev/ttyUSB_imu -> ttyUSB1
lrwxrwxrwx 1 root root         7  4月  4 16:22 /dev/ttyUSB_lidar -> ttyUSB0
lrwxrwxrwx 1 root root         7  4月  4 16:22 /dev/ttyUSB_mcu -> ttyUSB5
lrwxrwxrwx 1 root root         7  4月  4 16:22 /dev/ttyUSB_servo_arm -> ttyUSB6
lrwxrwxrwx 1 root root         7  4月  4 16:22 /dev/ttyUSB_stp_h -> ttyUSB4
lrwxrwxrwx 1 root root         7  4月  4 16:22 /dev/ttyUSB_stp_xy -> ttyUSB2
lrwxrwxrwx 1 root root 7 4月 4 16:22 /dev/ttyUSB_stp_z -> ttyUSB3- 感谢你赐予我前进的力量


